Thursday, September 30, 2010

I DID IT! I made a button!

Finally, I figured it out. And it was one of those 'Duh, you should have known how to do that' moments! Go figure! Either way I'm really excited to have done this all by myself. It will have a nice little home on my sidebar after this post is up so grab it, show it and make me happier!!

(I'll probably change the image soon though, because this one came out kind of grainy once I shrank my drawing to fit.)


Now if only I could figure out how to make my own background...
P.S. I get the self-teaching-computer-geek from my daddy. One great thing me passed on to me before he passed on.

Tuesday, September 28, 2010

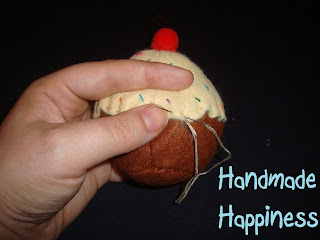
Finally, felt cupcake tutorial!


I've shared this tutorial on The Sugar and Spice Weekly Link Party at BCD 125


It's my birthday tomorrow, so I figured it would be the perfect day for my felt cupcake tutorial! I only have one to show you right now as the other 5 are in the middle of "baking"!

You will need:
*Template- click here
*Felt for bottom and side of cupcake. In this case, it's chocolate brown.
*Felt for frosting. This one is a cream cheese frosting.
*Matching embroidery thread for both.
*Poly fill
* optional-4 to 6 different brightly colored embroidery threads for sprinkles
* optional-red pompom and maroon embroidery thread for cherry


Now that you have all of you supplies, lets get started.
Cut out your pattern pieces from your felts.

Sew the triangle cutouts together to form your cupcake top.


Embellish you top now. I added colorful sprinkles all over by just taking 2 stands of embroidery thread, and "sprinkling them all over in random order to look like real sprinkles.


I also added a cherry I made myself. To do this take a cherry sized pompom and threaded 4 stands of maroon embroidery thread through the center of it starting at whatever point will be the bottom.
Pull the threads tight at the top and go back down to the bottom and then back up to the top. If you pull it tight it will hid the threads and make a little pucker in the top like a real cherry.
Now place a knot about an inch up to make your stem. Cut the excess as close to the knot as your comfortable with.


Sew to the top of the topper. You now have your cupcake top.


Onto the bottom, take the curved side piece and sew together the edges to make a little open ended cone.


Keeping the cone with the stitched side out, sew the small round bottom onto the cone.


Flip right side out so stitching is all on the inside of you cupcake bottom now.


Carefully line up your top to your bottom (you could pin it to keep it in place but I don't have a picture of this).


Stitch along the edges, making sure to always hit both the bottom and top with each stitch. Leave about 1-1/2 inches open to stuff.


Now stuff to desired feel and sew up the rest of the edge.


I made these to fit into a regular muffin pan so I could make a half dozen and it would be perfect for play.


I'm off to celebrate with my family! Have a great day!


As with all of my projects, I have designed them for my family and love to share with you so you can have them for your families as well. All projects, patterns and directions are meant for your personal use and neither the patterns nor completed projects are to be used for monetary gain.

Sunday, September 26, 2010

What's in my bag?

button

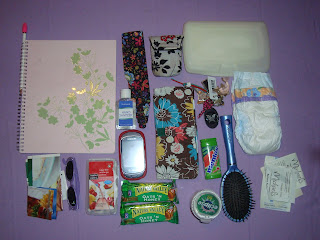
So, Roo over at Nice Girl Notes is hosting a "What's in your bag" party. Essentially we all seem to be nosy-neighbors and l-o-v-e to see what the rest of the world carries with them. So here is a party where we can all share and feel free to be our-nosy-selves! So here is what is in my bag!


1.) Notebook- because I don't like to write on scrapes, I misplace them.
2.) Hand Sanitizer
3.) Headband- because I have bangs that I don't like every other day.
4.) Pile of coupons- oh yeah, that's how they are thrown in there!
5.) Tinkerbell sunglasses for Peanut
6.) On-the-go water packets
7.) My cell phone
8.) My camera and the case I made for it.
9.) My wallet that holds all of my cards, plus two pens, my check book and register.
10.) My keys that technically hold more key chains than keys.
11.) Two granola bars- to keep hungry kids happy.
12.) Fruity gum to stay awake.
13.) Minty gum to freshen.
14.) Hair brush
15.) Baby wipes
16.) Two extra diapers (Roo, I'm looking into those Diaper Buds BTW!)
17.) Pile of receipts that would usually be in my wallet.

And wow, I didn't realize how much flowery stuff I had in there until I laid it all out!
Now head on over, dump that bag and link up with us!!

Sunday, September 19, 2010

Amber's Lemon Summer Cupcake-in-a-jar recipe


I made this for my son's teachers birthday and it was a great hit! It also makes a great full size cake.
This recipe will make one 9x9 cake that you will cut in half to create two cakes from which you will cut the smaller cakes. My jar was about 4 inches tall and if I'd had another one this recipe would have made at least one more with some leftovers. Possibly even 3. You could even double the recipe, use a 9x13 and make a lot more. Or just a regular cake for a potluck, birthday, ect. So with no further ado, here it is!

Ingredients
* 1/2 cup butter, softened
* 1-1/4 cups sugar
* 1-1/2 cups all-purpose flour
* 1 teaspoon baking powder
* 1/4 teaspoon salt
* 2 large eggs
* 1 teaspoon vanilla extract
* 1/2 teaspoon lemon extract
* 1/2 cup milk
* 1 teaspoon grated lemon peel
* 1 tablespoon lemon juice

Preheat oven to 350 degrees. Grease and flour your pan and set aside. Combine dry ingredients in a large mixing bowl. Add wet ingredients one at a time making sure to incorporate them well. Mix all ingredients for two minutes. Pour batter into pan and bake for 30 minutes or until a tooth pick inserted in the center comes out clean.
Let cake cool completely. Turn out onto a plate and cut the cake horizontally through the center. Level out the two by cutting off the top of the top cake and flip over so both middles are now up. Cut on circles just a tab bit smaller than the opening of your jar. I had a biscuit cutter that was just the right size. Build the jar up cake, icing, cake, icing until the jar is full. You can make your own icing or buy premade. I got lazy near the end and just grabbed a jar of premade vanilla frosting, added 7 drops of yellow food coloring and 2 tablespoons of lemon juice. It is absolutely delightful by the way! Very refreshing, and not too rich. Plus I had extra to put away for a graham cracker snack later, yum-me! Decorate your jar(s) and tie on a label and your ready to gift! *Here's were in my 11:30-at-night-over-tired-mommy world I said out loud to myself, "Now stick a fork in it, your done!"*


Enjoy!

So far this has been shared at The Girl Creative Party Blog

Monday, September 13, 2010

Felt food tutorial #1 - Felt pizza


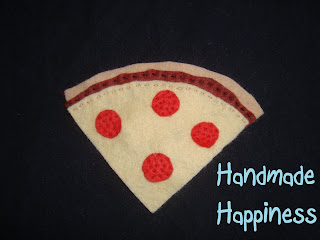
Thin crust pepperoni pizza is Peanut's favorite so the felt thin crust pepperoni pizza was born! This was super easy once I made the pattern. I hand stitched all of my felt foods but you can machine them as well. I used a straight stitch on the sauce and cheese. A whip stitch for the outside of the crust (wish I had done a blanket stitch though) and just spot tacked the pepperoni. I really like the portability of this project. I packed all of my supplies into a container and can take them with me while I wait in line for my son to get out of school or take it as far as the couch to be with the family during TV time! Do you want one? Okay then let's do this!

You'll need:
Pizza pattern This is my first PDF so if it doesn't work for you email me and I'll send it to you!
Felt for cheese(buttermilk color), crust (beige), sauce (maroon), pepperoni (scarlet)
Coordinating embroirdery floss
Center stabilizer- most people use cardboard but I have this hard felt I bought at Joann's over a year ago and I like it better. (I have a 2 year old, things get wet unexpectedly. Like when they take them to the real sink!)
Also I added velcro to the back of the bottom crust because I have a pizza pan project slated for the near future.


First print and cut out all of your pattern pieces, four of all except the pepperoni, I made four per slice so 16 total.

At this point I added the velcro to the back of the bottom piece.


Now, I've tried many different combinations for building the pizza and this is what worked the best.

Sew the sauce onto the back of the cheese like this...


Now sew the edge crust onto the back of the sauce like this...


Now sew on the pepperonis like this...


Now sew bottom crust onto the front like this...


Slide the stabilzer piece in like this...


Finish sewing the rest of the way around. And you now have a playful pepperoni pizza! You can make just one, but I know you'll want three more so you can share your pizza... I mean so the kids can share their pizza!


If you like this one just wait until I put up my tutorial for the cutest cupcakes!! See you soon!


So far this has been shared at The Girl Creative Party Blog


As with all of my projects, I have designed them for my family and love to share with you so you can have them for your families as well. All projects, patterns and directions are meant for your personal use and neither the patterns nor completed projects are to be used for monetary gain.

Sunday, September 12, 2010

Oh, my! My last post was two weeks ago?

My blog is brand new and I've already dropped the ball! Well not really. I just started it at the wrong time. Now that school has started, Peanut's birthday has passed and we've found our new routine I should be back on track. So stay tuned because I have been busy with some felt food that I am so excited to share with you all. The first felt food tutorial will be up by tomorrow night!