Friday, October 29, 2010
Sorry, I'm not myself right now
So this week has been kind of horrible. I've been recovering from a past illness and Hubby got strep, now I think I'm getting it too. Also had a few Halloween plans. One was my son's first ever class party. I was supposed to be a Room Mother for this. It started at 11 on Thursday, which was a half day so they got out at noon. I got there at 10:50 to a Lock down due to a convict on the run in his underwear. I stood outside of the school with a growing amount of parents, some there for the parties others to pick up their kids. Missed the whole thing. We did manage so far to make it to the pumpkin patch. Got half way through the carving tonight and had to stop for not feeling well. Hopefully this weekend will be better and I'm really hoping to have a new project up for you guys if I can get to it. But at least I'll have pictures of the kids in their costumes to share!
Wednesday, October 27, 2010
Teddy Trousers or How to make a pants pattern bigger
 |
| Pantless Teddy |
Okay, so on Monday afternoon I was informed of a Teddy Bear Tea Party my son's class was having on Wednesday (today). Monday night he picked the Teddy he wanted to take and proceeded to tell me he needed some pants. Tuesday afternoon I made a pattern and set it aside. Tuesday night when I sat down to sew the pants I realized my pattern had been too small and I already cut the material. I didn't want to waste it so this is a method I've used before for some pants I've made for Peanut. I'll just let you know now, I make a lot of pants! So sometimes I fly through them so quick I don't realize I missed vital information new sewers might find useful. I always make my own pattern for the kids because it's so super easy, I pretty much just measure their waist, inseam and waist height then draw a rough pattern on some folded newspaper or poster board and fold the fabric so there will be two exact matches and cut. Then sew the curves open so I get legs and sew up the in seam. Hem, drawstring, and elastic and whatever else needs to be done, find a kid and put them on it. I pretty much did the same thing for the Teddy.
This is my to-small pattern/pieces.

Take your to-small pattern/pieces and cut them in half.

Now make another pattern piece the same height as the to-small pattern/pieces and add how ever much more space you need to make it work. In this case I did two inches because I needed it to be about 3-1/2 inches bigger when finished.

Now sew that piece in between the two halfs. Repeat on other pattern piece.

Now continue with you new pieces just as you would have with the original pieces.
And now Teddy is ready for his party. I think he kind of looks like James Dean!

Monday, October 25, 2010
Scrub refashioned to toddler dress- {not a} tutorial

This turned out so much better than I thought it would. It's actually the second one I made. I just did it, no pictures and no real steps written down.
Here's what I did. I had a couple of 2XL scrubs that I didn't know what to do with, the prints where way more Peanut than me so I figured she could use a jumper dress.
First I cut all of the usable fabric away from the side seams and removed the sleeves (saving them for later). This left me with two large pieces of fabric, a back piece with the top collar seam still intact and a front piece with the v-neck still intact.
Next I cut out general shapes like these. The straps need to be cut with one edge seam intact, this is the inside of the straps.

Then sewed on the straps pieces like this.

Then double folded over the arm seams and sewed, red circled areas only.

Then simply lined up the sides starting at the arm holes and sewed the sides together, then hemmed the bottom.


Voila, Peanut got a new jumper!
Thursday, October 21, 2010
Moments like this...
Okay, so I made myself a goal for my blog. Be consistant. So I told myself I would write a new post every other day as long as family permits. I'm really thinking about changing to Mondays, Wednesdays and Fridays though. Anyway, since I haven't been feeling well, I have been away from my craft corner but have been getting some prime cuddle time with Peanut. The (teeny tiny minuscule) down side to this I didn't really know what to post about today. Having kids brings unexpected things on almost a daily basis and that is how I found my post topic for today.
So before getting Peanut up from her nap I made her a snack and put it at her highchair. She sat and ate for a while then got down, and got another plate. A minute later she brought me this.
 Half of her apple slices and part of her whole wheat roll. She did the arranging herself too. She's 2! How in the world did my 2 year old come to think of this? And how sweet is she? Moments like this are when it makes you really think, 'I think I'm doing good by you.' Moments like this you know why you're a mommy.
So before getting Peanut up from her nap I made her a snack and put it at her highchair. She sat and ate for a while then got down, and got another plate. A minute later she brought me this.

Tuesday, October 19, 2010
Changin' in up a bit!
I haven't been feeling 100% the past few days so I haven't got much crafting done. But, hey, check out what I have done! I finally figured out how to do my own background! Yay! I also made a new header. But do you want to know the best part? I made a Tutorials page! All of my tutorials are on there with pictures and all new ones will be added as I write them. I've also made a Recipes page and Contact me page. I'm so happy now! I can create all of my own designs, yay again!
So, to conclude:
New header
New background
Tutorials page
Receipe page
Contact me page
Oh, plus a Twitter button!
Now just for the fun of it, how cute is this?

Look at those little hands!
So, to conclude:
New header
New background
Tutorials page
Receipe page
Contact me page
Oh, plus a Twitter button!
Now just for the fun of it, how cute is this?

Look at those little hands!
Sunday, October 17, 2010
{Not so} local wildlife
I just want to share these pictures I took with you all!
So check this guy out. He is our local Iguana... well it could be a girl, not sure. He is probably about 4 to 5 feet long and hangs out around the canal behind our house.
Here he is on the roof of the 2 story apartment building across the canal.

Here he is on our side of the canal, 5 feet from our patio door!

And here is another of his profile.

Iguana's aren't native to South Florida but they do thrive here. They are usually pets that got to big and the nimrod owners just release them. I'm not sure of this one's story but he is very wary of people and only lets you get about 6 feet away before taking off so he could possibly have hatched in the wild. But either way he seems to be healthy and is pretty interesting to watch.
Happy Sunday!
Friday, October 15, 2010
'Where is my mate?' missing sock bag

I've shared this tutorial on


So, one of my pet peeves is missing socks. I've even gone as far as to number the bottoms of socks to try to keep track of how and when and where they were jumping ship. FYI it didn't work. So I've been using an old plastic bag to hold all the socks that come out of the dryer alone. Finally I thought, 'Why not make a cute little missing sock bag?' So I did, and here he is!
You'll need:
Fabric for bag
Design for bag *click here*
Embroidery supplies (or you could paint it or iron transfer it or any other method of putting an image on fabric!)
Basic sewing supplies
Cord or drawstring

Cut two pieces of fabric for your bag. Mine were 14in/14in.

Print out design or draw one and tape to window (or you can use a light box if you have one).

Find the center of one bag piece and tape fabric over your design.

Trace design onto fabric.

Now embroider your design. Or paint it or whatever you want to do to get it done!
Have I mentioned I'm no pro? I went to CraftStylish to figure out how I wanted to do my stitching.
I used a back stitch on my words, a split stitch on the sock out line and fill, a chain stitch on the mouth, and I just kind of stitched all over the eyes not really with any method.


When I got the designs done, I grab some patch scrapes I had laying around and ironed them to the back of the design to cove my raw back full of stitching.

Then fold over and hem the top leaving space for the drawstring (apparently I did not leave enough for the gray one I had wanted to use and I had to change to a skinnier black one.)
Then with your right sides together sew the right, bottom and left sides of the inside of the bag, again leaving the drawstring holes open.

At this point you can serge the edges or zigzag stitch them to finish them but I was being beckoned for a water play session with Peanut so I used Fray Blocker all around the raw edge. I have to move my machines every time I use either of them so it's just easier and quicker sometimes to just grab a tube of blocker instead!

Now run the drawstring. Start at one side go all the way through to the other side then right back in the next hole and out the other side.

Now tie a knot at the end of your drawstrings and flip your bag right side out.

How does it look? Good? Alright now put those poor lonely socks in and hang it up! Good bye crappy plastic bag!

As with all of my projects, I have designed them for my family and love to share with you so you can have them for your families as well. All projects, patterns and directions are meant for your personal use and neither the patterns nor completed projects are to be used for monetary gain.
Wednesday, October 13, 2010
Trying to reason with hurrican season
So as I've said already, we live in South Florida. Right where every hurricane or none of them will hit! When they do get us we're generally without power for a few days. Now this isn't just for people in hurricane paths. It's for anyone really, because anyone can loss power. Right after Peanut was born, while we lived in Ohio, a freak wind storm hit and we were out of power for 4 days! But anyway, when we're without power the biggest thing is keeping the kids busy. It usually gets too hot inside without AC or fans so playing outside is the go-to. We live in the city, you walk out our front door and there is about 10 feet between door and parking spaces. (We are fortunate enough to have a side yard and a few patios though.)
My poor front patio is a work in progress. We're still battling all of the bland and stupid the previous owners inflicted on the whole property.

So small is key here. And portable. So I made these.

And these.

To go with this.

It's really simple; bean bags, an old coffee container and some sidewalk chalk keep kids busy for an amazing amount of time! And once they get bored with the game they always find new ways to utilize the bean bags and sidewalk chalk!
All I do is place the container in the center of three circles (sometimes a little duct tape is needed for those 'Iron Man' throws). The outer circle being 1 point, the second being 2 points and the third being 3 points. The container is 4 points.

Draw a Stand Behind line about 5 feet away for the younger kids, for older kids you can push it back more. Now let 'em fly!

You can even keep track of the score in a little box off to the side!

This makes a good party game too! Have fun!
My poor front patio is a work in progress. We're still battling all of the bland and stupid the previous owners inflicted on the whole property.

So small is key here. And portable. So I made these.

And these.

To go with this.
It's really simple; bean bags, an old coffee container and some sidewalk chalk keep kids busy for an amazing amount of time! And once they get bored with the game they always find new ways to utilize the bean bags and sidewalk chalk!
All I do is place the container in the center of three circles (sometimes a little duct tape is needed for those 'Iron Man' throws). The outer circle being 1 point, the second being 2 points and the third being 3 points. The container is 4 points.

Draw a Stand Behind line about 5 feet away for the younger kids, for older kids you can push it back more. Now let 'em fly!

You can even keep track of the score in a little box off to the side!

This makes a good party game too! Have fun!
Monday, October 11, 2010
Manic Monday
I had a new tutorial planned for today but life took over. All morning doing crappy call backs to different people who needed me to call them but where never available when they say they will be had me a bit frazzled. But then when Doddle Bug came home and finished his homework I got some of this...

That turned into this...

A little later I did this...

She picked her color.
And wrapped it all up with this.

I'm going to relax and enjoy some cookies now. Good night Manic Monday.

That turned into this...

A little later I did this...

She picked her color.
And wrapped it all up with this.

I'm going to relax and enjoy some cookies now. Good night Manic Monday.
Saturday, October 9, 2010
Meet my Monsters!

So here they are. These are my monsters! There's the Hubby of course, who works like mad so I can be a stay at home mom. We met at a dog park in December 2002, and we got married on January 1, 2004 the anniversary of our first date.
Jordan came along April 2005 after a miscarriage. He's in Kindergarten and is an awesome little trooper! He likes Lightning McQueen, building things and doing almost anything you can dream up. He's daddy's little right hand man, and mommy's little helper. Just don't ask him to squish a spider!
Marley came September 2008 after another miscarriage. She was stubborn, we had to induce because she didn't want to come! She's been stubborn ever since. You say crawl, she scoots, you say sit, she stands. But she's a big 'fraidy cat! So I get extra lovin' when daddy runs the shop vac, or a power tool, or if she sees a bug, or the Big Foot toy they have at Target! Her and I didn't bond very well at first but now she's got a tether to my hip (which I attribute to our baby wearing)and I wouldn't have it any other way!
Jet is a little black beauty, she's 5. Rain is 1 and our little miracle kitty. Hubby found him abandoned in the back of an old pickup truck. His eyes were still closed. We brought him home and hand raised him. To our surprise he turned out to be a Russian Blue mix. I just hope the rest of his kitty family is doing as well as him.
Seeing as I'm always the one behind the camera, I didn't put myself on here. But I'm pretty sure along the way you can figure me out!
Now about my babies "exception", they both have Apraxia of Speech. Hubby had it too. Any other children we may have have a 50/50 chance as well. In a nut shell they know what they want to say but their brains can't send the right signals to the muscles in their jaw, tongue and mouth to form the words properly. This had held Doodle Bug back a bit as people don't usually understand him and we sometimes even have trouble with it. He's still learning his alphabet and the sounds they make but he is growing his vocabulary and mind by leaps and bounds! He actually got the Most Improved award for his class because his teacher has never seen someone come as far as he has in 7 weeks! Peanut on the other hand still refuses to call me mama, everyone is dada to her. She will also only say hi, hot, ah and yea. Anything else she doesn't feel comfortable with trying yet. Doodle Bug didn't really find his words until right after his 4th birthday, Hubby didn't really start talking until he was five so we know Peanut will catch up eventually, it'll just be a long road. But I know my babies can do it!
So that's my family! Hope you enjoyed meeting my monsters!
Thursday, October 7, 2010
3D Applique Trick or Treat bag tutorial

These bags are so simple and customizable you can make one for everyone! I just started this project meaning to make the bag with a plain felt applique, then it grew. It grew to a felt applique and embroidered Happy Halloween applique. Then as I was sewing on the first felt applique I thought, "I really could make this 3D." So, this simple bag took on it's own little life.
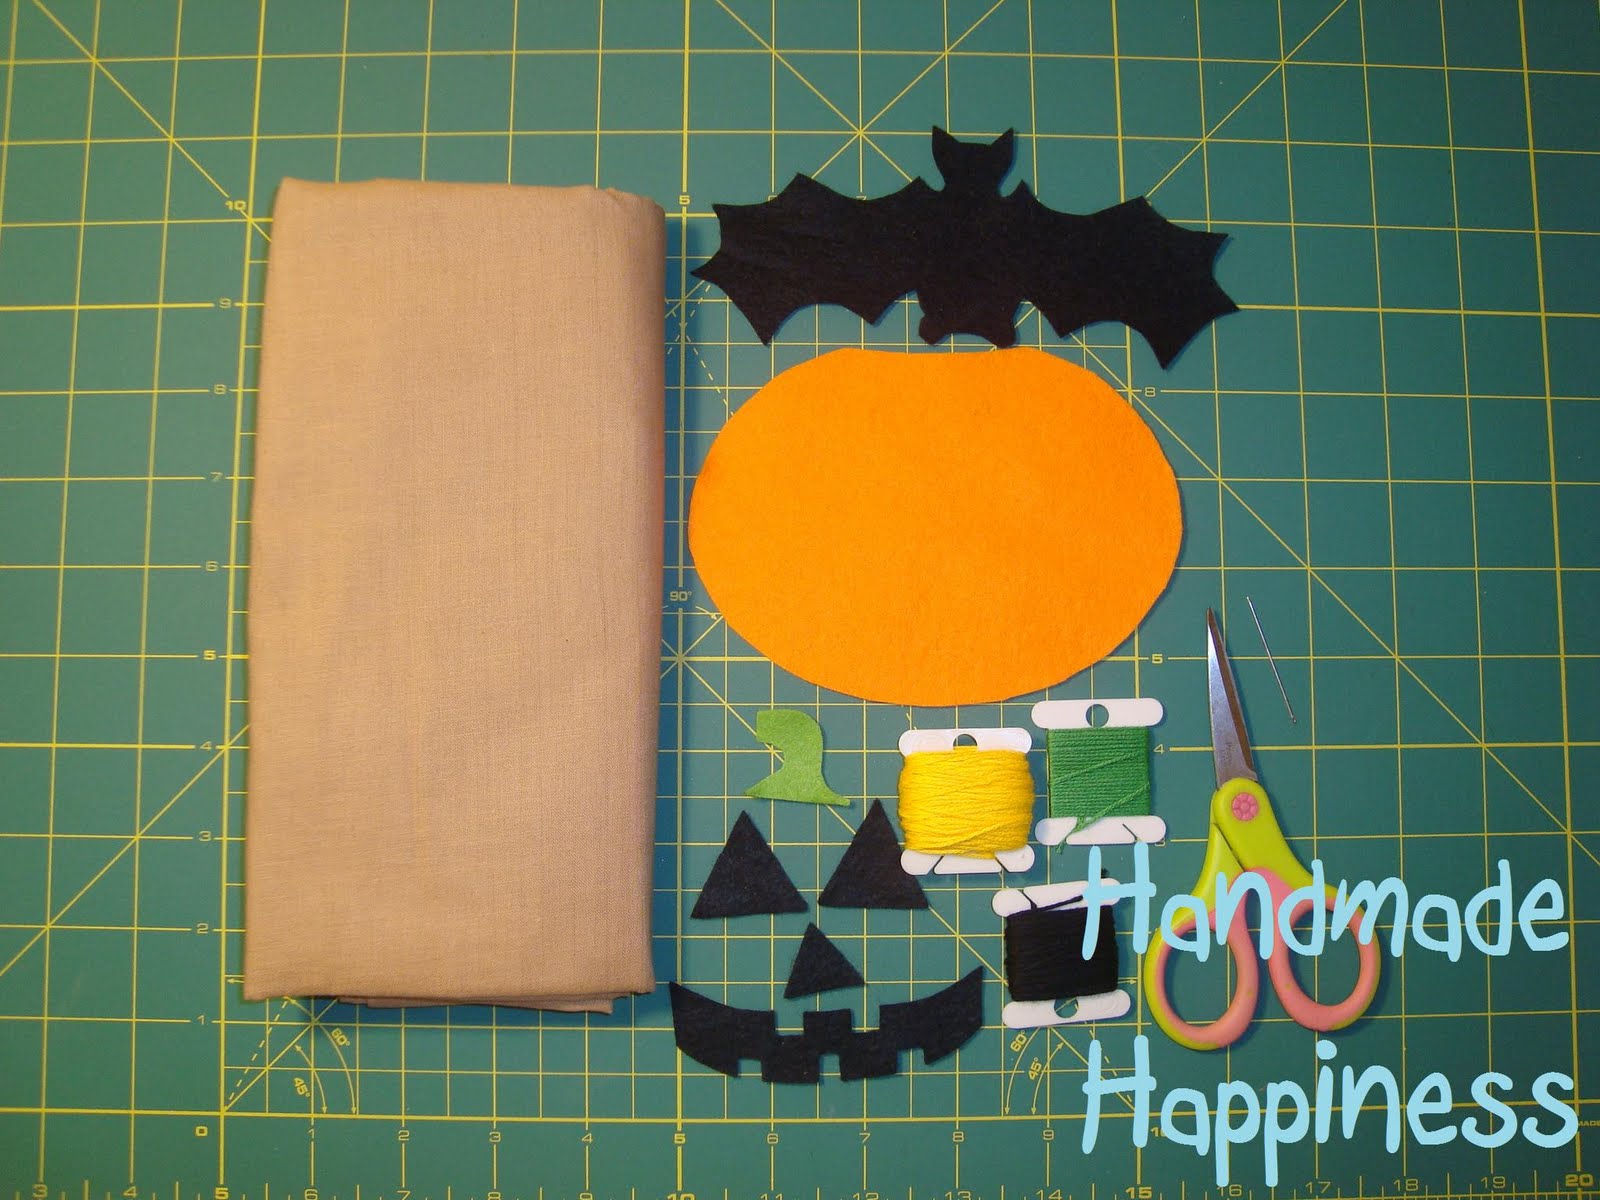
You'll need:
Fabric for your bag
Felt for applique
Coordinating embroidery floss
Sewing machine or you could do the whole thing by hand, like my Grandma used to. :)
Matching thread (mine didn't match but I didn't want it to)
Felt scraps or poly fill
Drawstrings/cord about 2 yards
Needle
Scissors and/or rotary cutter
*Optional items could be the embroidered patch like I did or trim or another applique or anything you can dream up, like I said totally customizable!
Let's start making a basic bag. I cut one piece of the bag fabric 14 inches by 26 and folded it in half. You can make it smaller or larger. (My little ones get tired of carrying things so mine are a little smaller than ones you'll find in stores probably.)

Now fold the 2 top edges of your bag over about an inch to make the hem and sew. Be careful here because you'll need room later for you draw strings! Set it aside.

Now you'll make your applique. Make whatever fits the bags carrier. You can freehand this design or look up clip art or if you want my pumpkin or bat you can use them too! Drop me a line and I'll email them to you! (All I did to make them was use the freehand option on Paint and printed them on card stock and cut them out to make my pattern. For my pumpkin though I printed it twice so I could cut my face pieces out as well.) Felt appliques are so easy I could do them all day! All you do it piece them together or in this case I just placed the face pieces where I wanted them and sew them on. As you probably already know from my felt food tutorials I love hand stitching on felt so of course this is what I did here too! Fell free to use your machine though.
Now lay out your bag piece with the folded edge down, right side facing you. I just eyeballed the center and then moved down about 1-1/2 inches so it would be centered when finished. Sew on applique, leave a small spot about an inch open.


Now, I didn't feel like getting out my poly fill for such a small amount so here is what I did. I made felt fill! I just took tiny little pieces out of my scrap container that were probably too small to make anything with (but my felt is so precious to me I can't bring myself to throw any of it away) and ran my rotary cutter through it in different directions about 20 times. I'm really glad I chose to do this because the little piece filled the corners of my bat better than poly fill would have!

Now stuff that applique until it is a nice little raised character. Don't stuff to much or it will pull on your bag and now look right.
Sew the opening closed.

At this point I positioned the embroidered patch and stitched it to the other side as well.

Flip bag piece so it is inside out.
Now sew down the sides making sure to not sew the very top edge closed because again you'll need that for your drawstrings.

Next you'll cut out a square from each bottom corner. I wanted Peanuts (the pumpkin bag) to be shorter and more round so I cut out a square about the size of a post it note. For Doddle Bug's (the bat bag) I wanted it to be taller and more bag shaped so I cut squares about 1-1/2 inches.

Pick up your bag and pull the square cut out to make a flat corner and sew (for pictures and instructions on this see my lunch bag tutorial. I got a little ahead of my self before I realized I hadn't taken pictures yet! I'm sorry, I got excited to see my bags!)
Do this on both sides so you now have a bottom to your bag. Flip right side out. Your bag should 'sit' now.

Now put in your drawstrings.
Grab one of your cords or drawstrings. Starting at the first hole in the hem on the right front of your bag feed it through until it comes out the other side. Now feed the same one through the back left hole all the way through to the other side. Once you have it all the way line up the ends and tie a knot. Now take your other one and starting at the front left hole feed all the way through to the end and into and through the back right hole until it comes out the other side. Line up and tie these too.


Now try it out. Did it work? I hope so because that means your all done! It's so much easier than you think, I promise!

Enjoy Trick or Treating!!
I've shared this tutorial at


As with all of my projects, I have designed them for my family and love to share with you so you can have them for your families as well. All projects, patterns and directions are meant for your personal use and neither the patterns nor completed projects are to be used for monetary gain.
Subscribe to:
Posts (Atom)